Hide WordPress Login
Hide WP Login helps protect your WordPress login area by blocking direct access to the default WordPress login endpoint and replacing it with a custom login URL.
When enabled, Authica can prevent visitors and bots from accessing the standard login paths, such as: /wp-login.php and /wp-admin/.
Instead, users access the login, register, and lost password views through the custom Authica login URL.
This helps reduce automated login attacks, scanner traffic, and unwanted access attempts against the default WordPress login page.
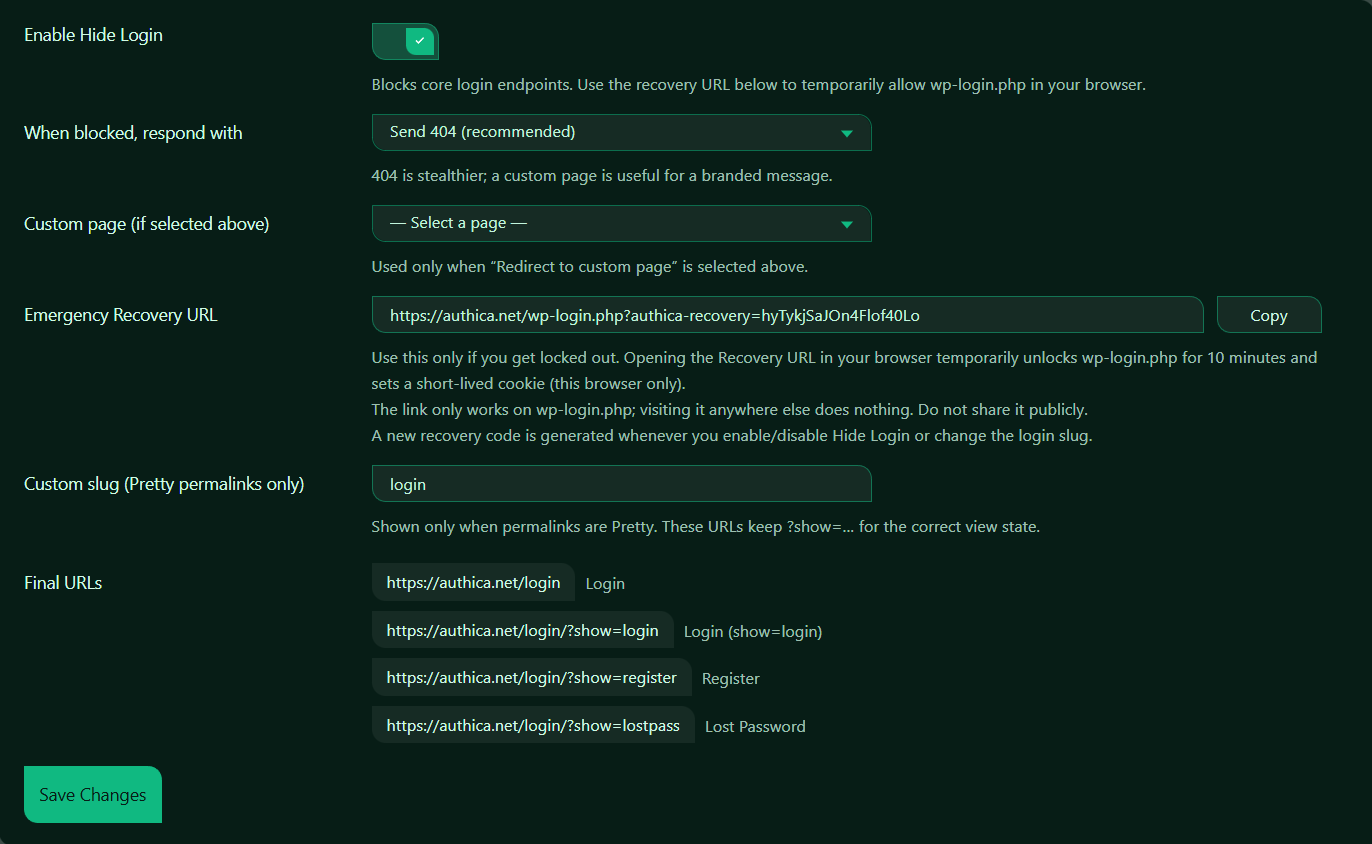
Enable Hide Login
This setting turns Hide WP Login protection on or off.
When enabled, Authica blocks direct access to core WordPress login endpoints and requires users to use the custom login URL instead.
Recommended setting: Enabled.
Before enabling this feature, make sure you know your final login URL and save the emergency recovery URL somewhere safe.
When Blocked, Respond With
This setting controls what Authica shows when someone tries to access a blocked login endpoint.
Send 404
This is the recommended option.
A 404 response makes the blocked login page look like it does not exist. This is stealthier than showing a clear security message.
Use this when you want to reduce obvious signs that the login endpoint is being protected.
Redirect to Custom Page
This option sends blocked visitors to a selected WordPress page.
Use this when you want to show a branded message, support instructions, or a custom access page. A custom page is more user-friendly, but less stealthy than a 404 response.
Custom Page
This setting is used only when the blocked response is set to redirect visitors to a custom page.
If Send 404 is selected, this setting is ignored.
Use this field to choose the WordPress page where blocked visitors should be sent.
Use a custom page only when you intentionally want visitors to see a branded message.
Use 404 if you want a stealthier security response.
Emergency Recovery URL
The Emergency Recovery URL is a temporary unlock link that allows administrators to access wp-login.php if they get locked out.
This URL is very important.
Opening the recovery URL in your browser temporarily unlocks access to wp-login.php for that browser only.
In Authica, the recovery URL:
– Temporarily allows wp-login.php access
– Works only in the browser where it was opened
– Sets a short-lived browser cookie
– Usually lasts for 10 minutes
– Does not permanently disable Hide Login
Important
Save this URL somewhere private before enabling Hide Login.
Do not share the Emergency Recovery URL publicly.
Copy
The Copy button copies the Emergency Recovery URL to your clipboard.
Do not place the recovery URL on a public page, public support ticket, or shared screenshot.
Custom Slug
The Custom Slug controls the new login path used by Authica.
For example, the slug is: login.
That means the main login URL becomes: https://example.com/login.
Recommended slug rules:
– Use lowercase letters
– Avoid spaces
– Avoid special characters
– Keep it simple enough for trusted users to remember
– Do not use an existing page slug
Pretty Permalinks Only
The custom slug option works with WordPress Pretty Permalinks.
If your site is not using Pretty Permalinks, Authica may use query-based login URLs instead.
You can check this in WordPress: Settings → Permalinks.
Recommended permalink setting: Post name.
Final URLs
The Final URLs section shows the actual URLs Authica will use for login-related views.
These URLs help you confirm exactly where users should go.
Save Changes
After changing Hide WP Login settings, click Save Changes.
Settings are not applied until saved.
Recommended Configuration
For most websites, we recommend:
Enable Hide Login: Enabled
When blocked, respond with: Send 404
Custom slug: login, signin, or another private login slug
Recovery URL: Saved securely
For a more user-friendly setup:
Blocked response: Send 404
Custom page: Not used
Important Notes
Hide WP Login can protect your default WordPress login endpoints, but you should always save the Emergency Recovery URL before enabling it.
If you change the custom slug, update any saved bookmarks, admin notes, team instructions, or login buttons that point to the old URL.
If your site uses caching, security plugins, redirect plugins, or server-level rules, test the final login URLs after saving changes.