Social Login
Social Login lets users sign in with trusted OAuth providers instead of entering a WordPress username and password.
When enabled, Authica can display provider icons below the login button and allow users to authenticate with providers such as Google, GitHub, Microsoft, Facebook, Discord, LinkedIn, and other supported services.
Social Login can also create a WordPress user account automatically when the provider email address does not already exist, depending on your account creation setting.
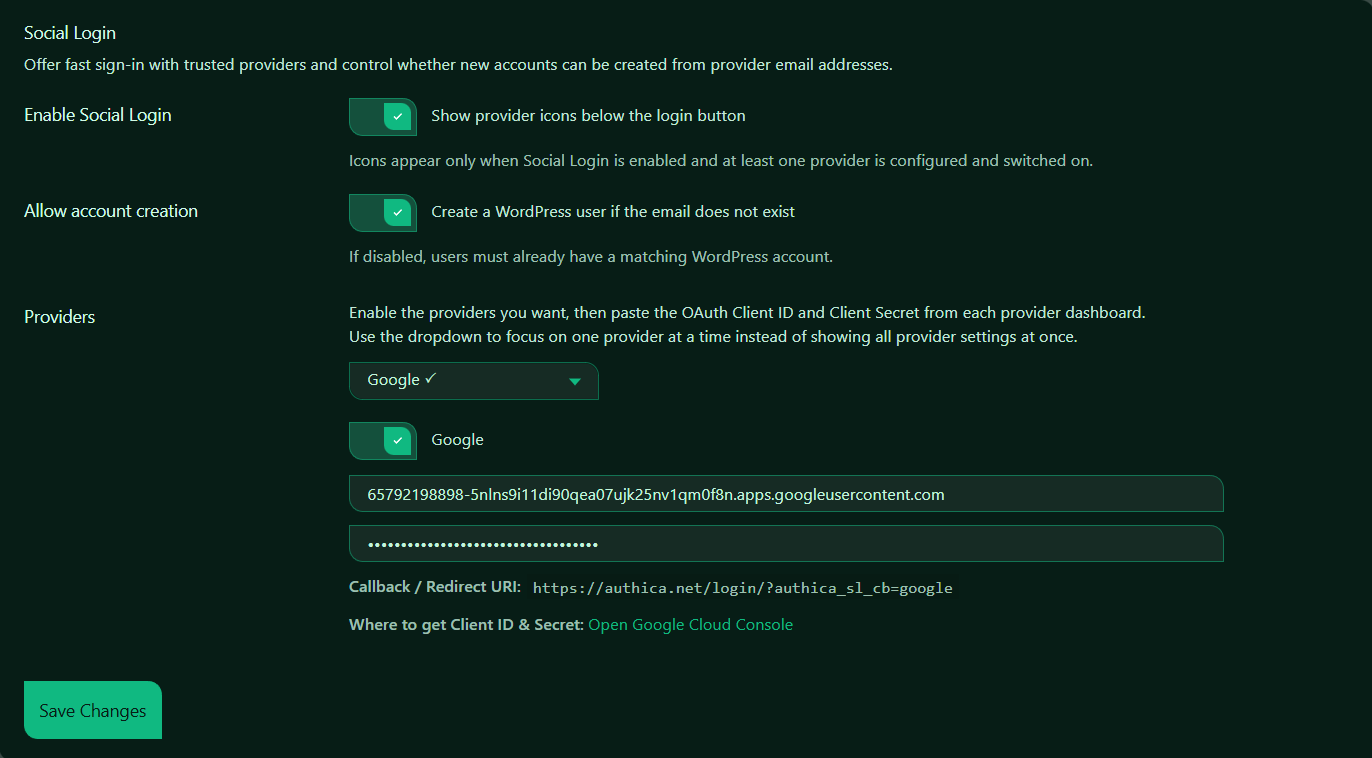
Enable Social Login
This setting turns Social Login on or off.
When enabled, Authica can show social provider icons on the login form.
The provider icons appear only when:
– Social Login is enabled
– At least one provider is configured
– At least one provider is switched on
Recommended setting: Enabled.
Use this if you want users to sign in faster with trusted third-party accounts.
Allow Account Creation
This setting controls whether Authica can create a new WordPress user when someone signs in with a provider email address that does not already exist on your site.
When enabled:
If the provider email does not match an existing WordPress user, Authica can create a new WordPress account.
When disabled:
The user must already have a matching WordPress account email address before Social Login can be used.
Recommended usage:
Enable this for public registration or membership sites.
Disable this for private sites where only existing users should be allowed to sign in.
Providers
The Providers section lets you choose and configure each social login provider.
Each provider usually requires:
– Provider enabled/disabled toggle
– OAuth Client ID
– OAuth Client Secret
– Callback / Redirect URI
You need to create an OAuth application inside the provider’s developer dashboard, then copy the Client ID and Client Secret into Authica.
The dropdown helps you focus on one provider at a time instead of showing every provider configuration at once.
Provider Dropdown
The provider dropdown lets you select which provider settings you want to edit.
A check mark may indicate that the provider has been configured or enabled.
Use this dropdown when switching between different provider settings.
Provider Enable Toggle
Each provider has its own enable toggle.
When a provider is enabled and properly configured, Authica can show that provider’s icon on the login page.
When disabled, that provider will not appear on the login form even if Client ID and Client Secret are saved.
Recommended workflow:
1. Select a provider.
2. Enter the Client ID.
3. Enter the Client Secret.
4. Add the Callback / Redirect URI in the provider dashboard.
5. Enable the provider.
6. Save changes.
7. Test login.
Client ID
The Client ID is the public identifier for your OAuth app.
You get this value from the selected provider’s developer dashboard.
The Client ID tells the provider which OAuth application is requesting login.
Client Secret
The Client Secret is the private key for your OAuth app.
Important:
Keep the Client Secret private.
Do not publish it, share it publicly, or place it in visible page content.
If you believe the Client Secret was exposed, generate a new one in the provider dashboard and update it in Authica.
Callback / Redirect URI
The Callback / Redirect URI is the URL the provider sends users back to after authentication.
This URL must be copied exactly into the provider’s OAuth app settings.
If the callback URL does not match, the provider may reject the login attempt.
Important:
The callback URL in Authica and the callback URL in the provider dashboard must match exactly.
That includes:
– https://
– domain
– path
– query string
– trailing slash behavior, if required by the provider
Where to Get Client ID and Secret
Authica shows a provider-specific help link.
Use that link to open the provider dashboard where you can create or manage OAuth credentials.
Each provider has its own setup process, but the general flow is usually:
1. Create an OAuth app.
2. Add your site domain.
3. Add Authica’s Callback / Redirect URI.
4. Copy the Client ID.
5. Copy the Client Secret.
6. Paste both values into Authica.
Save Changes
After changing Social Login settings, click Save Changes.
Settings are not applied until they are saved.
Recommended Configuration
For most websites, we recommend:
Enable Social Login: Enabled
Allow Account Creation: Enabled only if public registration is allowed
Provider: Enable only providers you actually want to support
Client Secret: Keep private
Callback / Redirect URI: Copy exactly into the provider dashboard
For private sites:
Allow Account Creation: Disabled
This ensures only existing WordPress users with matching email addresses can sign in through social providers.
Important Notes
Social Login depends on the provider returning a verified or usable email address.
If account creation is disabled, the provider email must match an existing WordPress user email address.
If account creation is enabled, Authica can create a WordPress user from the provider email, depending on your site configuration.
Do not enable providers that are not fully configured.