IP Restriction Settings
IP Restriction lets you control who can access protected parts of your WordPress site based on IP address.
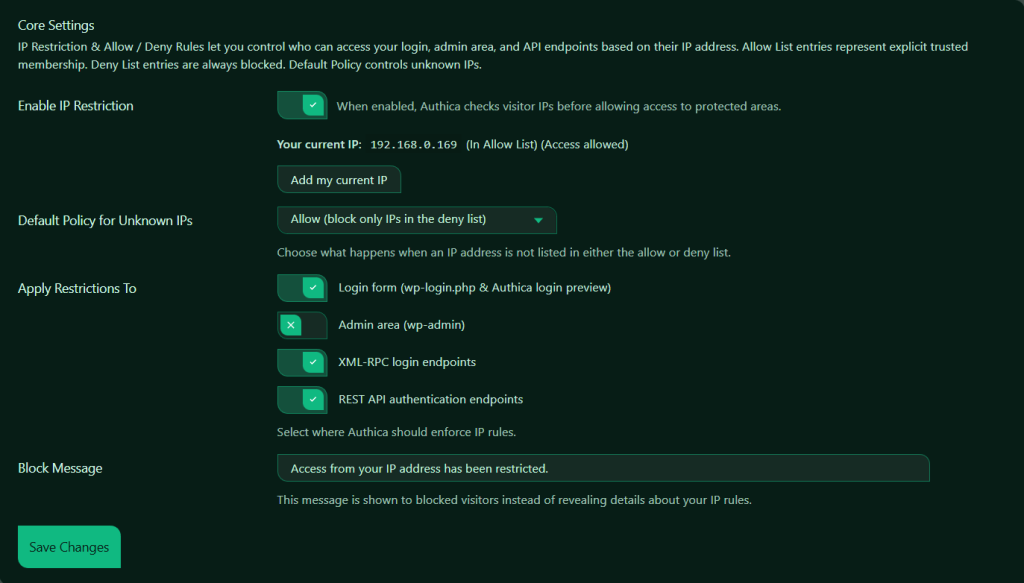
Authica can check visitor IPs before allowing access to selected areas such as the login form, WordPress admin area, XML-RPC login endpoints, and REST API authentication endpoints.
IP Restriction works together with the Allow List, Deny List, and the Default Policy for Unknown IPs.
Enable IP Restriction
This setting turns IP Restriction on or off.
When enabled, Authica checks the visitor IP address before allowing access to the protected areas you selected.
When disabled, Authica does not enforce IP-based access control.
Recommended setting: Enabled.
Only enable this after reviewing your own IP and your Allow/Deny list settings so you do not accidentally block yourself.
Your Current IP
This section shows the IP address Authica currently detects for your browser session.
This helps you quickly confirm whether your current IP is allowed, blocked, or unknown under the current policy.
Add My Current IP
The Add my current IP button adds your current detected IP address to the Allow List.
This is a very useful safety feature when configuring IP Restriction for the first time.
Recommended usage: Before enabling IP Restriction, add your current IP to the Allow List.
This helps prevent accidental lockout while testing or adjusting your rules.
Important note:
If your IP address changes often, such as on a residential or mobile connection, you may need to update your Allow List later.
Default Policy for Unknown IPs
This setting controls what happens when an IP address is not found in the Allow List or Deny List.
Common policy approaches: Allow unknown IPs and Deny unknown IPs.
Allow unknown IPs
This is the less strict option.
Use this when you want to block only specific IPs or networks while letting everyone else through.
Best for:
– Public websites
– Sites that only need to block a few abusive IPs
– Safer first-time setup
Deny unknown IPs
This is the stricter option.
Use this when only explicitly trusted IPs should have access.
Best for:
– Private admin environments
– High-security sites
– Internal or limited-access installations
Important:
If you choose to deny unknown IPs, make sure your own IP is already in the Allow List first.
Apply Restrictions To
This section controls where Authica should enforce IP rules.
You can enable or disable IP checks for different protected areas.
Available targets are:
– Login form (wp-login.php & Authica login preview)
– Admin area (wp-admin)
– XML-RPC login endpoints
– REST API authentication endpoints
Login Form
This option applies IP Restriction to the WordPress login form and the Authica login preview.
When enabled, Authica checks the visitor IP before allowing access to: /wp-login.php and related login access points handled by Authica. Use this to protect the login screen from unwanted or untrusted IPs.
Recommended setting: Enabled.
Admin Area
This option applies IP Restriction to the WordPress admin area: /wp-admin/.
When enabled, Authica checks the visitor IP before allowing access to admin pages.
Use this when you want to limit backend access to trusted IPs only.
Recommended usage: Enable only after confirming your own IP is allowed.
This is one of the most powerful IP Restriction options, but it can also cause lockouts if configured carelessly.
XML-RPC Login Endpoints
This option applies IP Restriction to XML-RPC login-related access.
XML-RPC is commonly targeted by bots and brute-force attacks.
When enabled, Authica checks IP rules before allowing XML-RPC authentication requests.
Recommended setting: Enabled.
This is especially useful if your site does not need public XML-RPC-based authentication.
REST API Authentication Endpoints
This option applies IP Restriction to REST API authentication endpoints.
When enabled, Authica checks visitor IPs before allowing authentication requests through supported REST API login/auth flows.
Recommended setting: Enabled.
This helps protect API-based authentication from unwanted or abusive IP addresses.
Block Message
The Block Message field controls the message shown to blocked visitors.
Avoid revealing too much information, such as whether the visitor was blocked by an Allow List or Deny List rule, unless you specifically want to expose that detail.
Save Changes
After changing IP Restriction settings, click Save Changes.
Your changes are not applied until they are saved.
Recommended Configuration
For most websites, a safe starting setup is:
Enable IP Restriction: Enabled
Default Policy for Unknown IPs: Allow
Apply to Login Form: Enabled
Apply to Admin Area: Optional
Apply to XML-RPC Login Endpoints: Enabled
Apply to REST API Authentication Endpoints: Enabled
Block Message: Access from your IP address has been restricted.
This setup blocks explicitly denied IPs while still allowing normal visitors unless they are on the Deny List.
For stricter security, use:
Default Policy for Unknown IPs: Deny
Allow List: Add only trusted IPs
Apply to Admin Area: Enabled
This creates a more locked-down environment for sensitive sites.
Important Notes
Before enabling strict IP Restriction, make sure you understand whether your IP address is stable or dynamic.
If your IP changes regularly, you may need to update your Allow List from time to time.
If your site is behind a proxy or service such as Cloudflare, make sure Authica is detecting the correct client IP address in your environment.
Always test carefully after changing settings, especially when protecting:
– wp-admin
– wp-login.php
– XML-RPC
– REST API authentication endpoints