IP Restriction Deny List
The Deny List contains IP addresses and IP ranges that Authica should always block.
Any IP or CIDR entry added to the Deny List is denied access to the protected areas covered by your IP Restriction settings.
Important behavior:
– Deny List entries are always blocked
– This happens regardless of the Default Policy
– Deny List rules override normal unknown-IP handling
This makes the Deny List the right place for known abusive IPs, unwanted networks, repeated attackers, bots, and any address that should never be allowed.
What the Deny List Is Used For
Use the Deny List when you want to block:
– Known malicious IP addresses
– Repeated brute-force sources
– Bot traffic
– Abusive visitors
– Unwanted countries or services after manual review
– Entire IP ranges or subnets
If an IP is in the Deny List, Authica blocks it from the selected protected areas, even if your default policy is set to Allow.
Manual / Import Entries
The page explains that:
– Single IPv4 addresses
– IPv4 CIDR ranges
– Single IPv6 addresses
– IPv6 CIDR ranges
Single IP Address
Use a single IP when you want to block one exact address only.
Example: 203.0.113.5
CIDR Range
Use a CIDR range when you want to block an entire group of addresses.
Example: 203.0.113.0/24 or 2001:db8::/48
This blocks the entire IPv4 subnet or entire IPv6 range.
Use CIDR carefully, because wide ranges can block many addresses at once.
Add Button
The Add button inserts a new empty row into the table.
Use it when you want to manually enter a new blocked IP or CIDR range.
After clicking Add, type the IP or network directly into the new row.
Recommended usage: Use Add for new manual block entries.
Delete Button
The Delete button removes selected Deny List rows.
Before clicking Delete, select the row or rows you want to remove.
Use this when:
– A block is no longer needed
– An IP was added by mistake
– A temporary threat is gone
– You want to clean old entries
Be careful when deleting known bad ranges if they are still actively abusive.
Selection Column
The first column is used to select rows for deletion or bulk actions.
Select one or more rows, then click Delete if you want to remove them.
If no rows are selected, Delete will usually do nothing.
IP / CIDR Column
The IP / CIDR column contains the blocked IP addresses and ranges.
This is the main value that determines what Authica blocks.
You can enter:
– A single IP
– A subnet
– An IPv6 range
Use precise entries whenever possible to avoid blocking more traffic than intended.
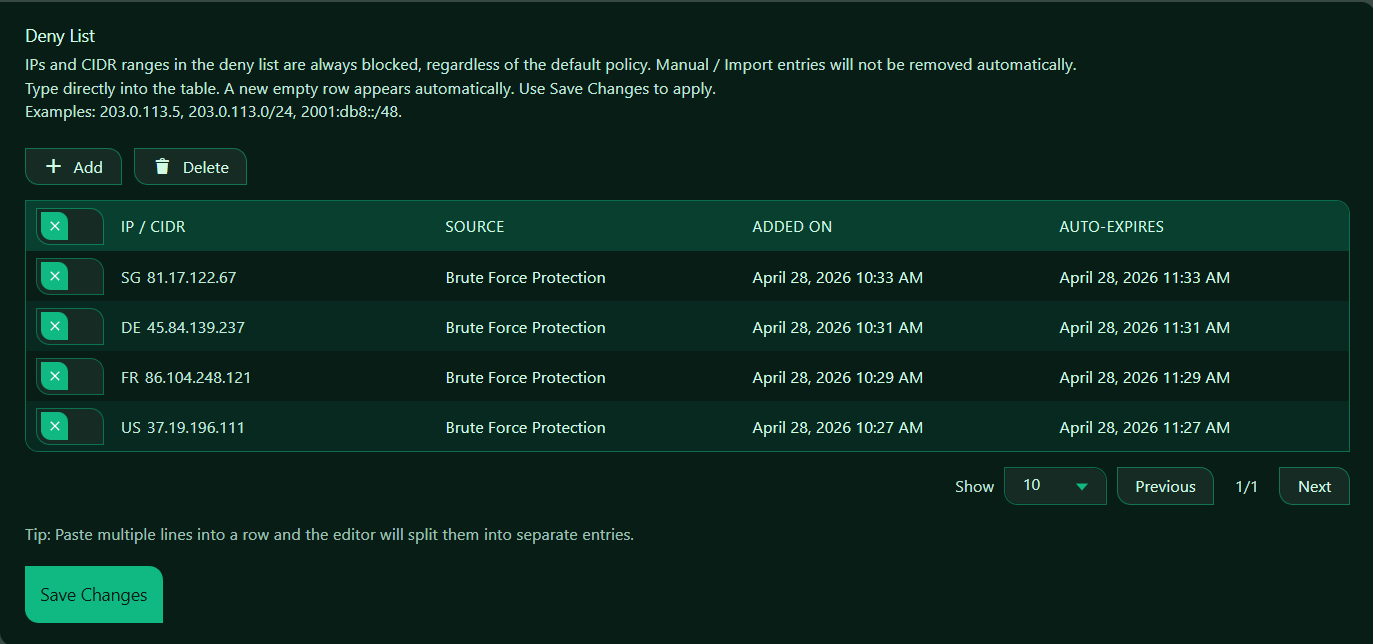
Source Column
The Source column shows where the block entry came from.
Depending on your setup, this may help identify whether an entry was:
– Added manually
– Imported
– Added by an automated Authica action
– Created by a security event or related feature
This is useful for understanding why an IP was blocked and whether the block should remain.
If the list is empty, no sources will be shown yet.
Added On Column
The Added On column shows when the Deny List entry was created.
This helps you understand:
– How old the block is
– Whether it was recently added
– Whether older blocks should be reviewed
This is especially helpful when auditing your Deny List over time.
Auto-Expires Column
The Auto-Expires column shows whether a block entry will expire automatically.
If an entry has an expiration time, Authica may remove or stop enforcing it after that time.
If there is no expiration, the entry remains blocked until you remove it manually.
This helps you distinguish between:
– Permanent block entries
– Temporary block entries
Paste Multiple Lines
This is useful when you already have a list of IPs or ranges you want to block.
Example paste:
203.0.113.5
203.0.113.6
203.0.113.0/24
2001:db8::/48
Authica can split them into separate Deny List entries automatically.
Save Changes
After adding, editing, or deleting Deny List entries, click Save Changes.
Changes are not applied until they are saved.
Recommended Usage
Use the Deny List for addresses that should never access the protected areas covered by IP Restriction.
Good candidates include:
– Known attack IPs
– Persistent brute-force sources
– Repeat bot traffic
– Abusive API clients
– Malicious subnets
If you only want to block a small number of bad IPs, the Deny List is often enough, even with the Default Policy set to Allow.
How the Deny List Works with Default Policy
The Deny List always blocks matching IPs.
If Unknown IPs Are Allowed
If the default policy is Allow, then:
– Deny Listed IPs are blocked
– Allow Listed IPs are allowed
– Unknown IPs are allowed
This is useful when you want a mostly open site but still want to block specific bad IPs.
If Unknown IPs Are Denied
If the default policy is Deny, then:
– Deny Listed IPs are blocked
– Allow Listed IPs are allowed
– Unknown IPs are blocked
In this stricter mode, the Deny List still matters, especially for keeping explicit records of blocked attackers or networks.
Best Practices
Recommended best practices:
– Block exact IPs first when possible
– Use CIDR ranges only when you are confident the full range should be blocked
– Review older blocks regularly
– Keep notes or internal records for important manual blocks
– Remove blocks that are no longer justified
Avoid blocking overly broad ranges unless you are certain they are appropriate.
Important Notes
Before blocking a range, think carefully about scope.
For example, blocking a full /24 can affect many addresses, not just one attacker.
If your site is behind a proxy or CDN, make sure Authica is detecting the correct real client IP address. Otherwise, you may not be blocking the actual visitor IP you intended.