Trurnstile Analytics
Turnstile Analytics allows Authica to display real Cloudflare Turnstile activity inside the Authica dashboard.
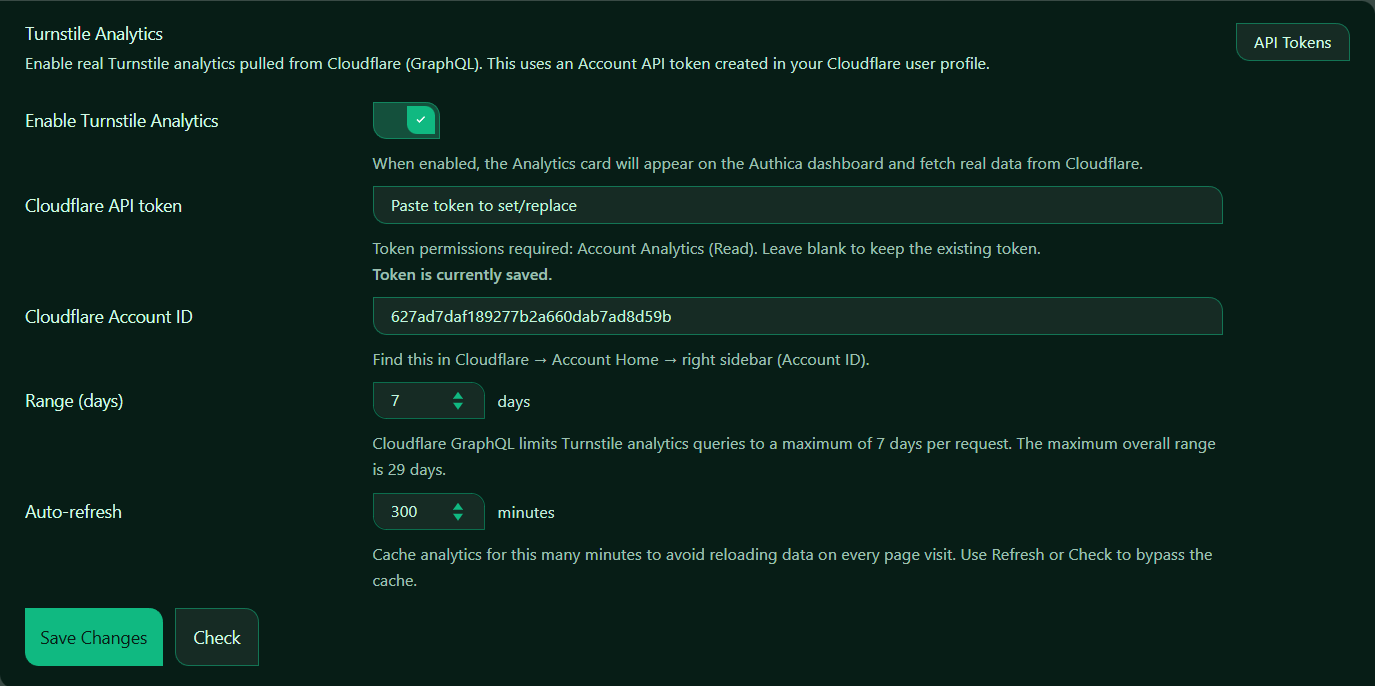
When enabled, Authica connects to Cloudflare using the Cloudflare GraphQL API and pulls Turnstile analytics data for your site. This makes it easier to review verification activity, challenge outcomes, and bot-protection behavior directly from WordPress.
To use this feature, you need a Cloudflare Account API token and your Cloudflare Account ID.
API Tokens
The API Tokens button opens the Cloudflare area where you can create or manage API tokens.
Authica uses an API token to securely request Turnstile analytics data from your Cloudflare account.
Required token permission: Read.
The token should be created in your Cloudflare user profile and should allow Authica to read analytics data for the correct Cloudflare account.
Enable Turnstile Analytics
This setting turns Cloudflare Turnstile Analytics integration on or off.
When enabled, Authica can display a Turnstile Analytics card on the Authica dashboard and fetch real data from Cloudflare.
When disabled, Authica will not request Turnstile analytics data from Cloudflare. Enabled, if you want Turnstile analytics visible inside the Authica dashboard.
Before enabling this, make sure your API token and Account ID are correct.
Cloudflare API Token
The Cloudflare API token field is where you paste your Cloudflare API token.
This token allows Authica to connect to Cloudflare and request Turnstile analytics through the Cloudflare GraphQL API.
If a token is already saved, Authica may show a message such as: Token is currently saved.
You can leave the token field blank if you want to keep the existing saved token.
Paste a new token only when you want to set or replace the current token.
Important
Keep your Cloudflare API token private.
Do not publish it, share it publicly, or place it inside visible page content.
Cloudflare Account ID
The Cloudflare Account ID field tells Authica which Cloudflare account should be used for analytics requests.
You can find this inside your Cloudflare dashboard: Cloudflare → Account Home → right sidebar → Account ID.
Copy the Account ID from Cloudflare and paste it into Authica.
Make sure the Account ID matches the same Cloudflare account where your Turnstile widget and analytics are available.
Range Days
The Range (days) setting controls how many days of Turnstile analytics Authica should request.
Cloudflare GraphQL limits Turnstile analytics requests to a maximum of 7 days per request. Authica can use this setting to decide how much recent analytics data should be shown.
Recommended setting: 7 days.
This gives a useful recent overview without requesting too much data.
Authica may support a larger overall range internally, but Cloudflare requests are handled in limited date windows.
Auto-refresh
The Auto-refresh setting controls how long Authica should cache Turnstile analytics data before requesting fresh data from Cloudflare again.
Recommended values: 300 minutes.
This means Authica keeps the analytics result cached for 300 minutes before automatically refreshing it.
This helps avoid unnecessary Cloudflare API requests on every dashboard visit.
Check
The Check button tests the current Turnstile Analytics configuration.
Use this after entering or changing: Cloudflare API token, Cloudflare Account ID and Range days.
The Check button can also bypass the cached analytics result and request fresh data from Cloudflare.
Save Changes
After changing Turnstile Analytics settings, click Save Changes.
Settings are not stored until they are saved.
Important Notes
Turnstile Analytics requires a valid Cloudflare API token and Cloudflare Account ID.
This feature is separate from basic Turnstile bot protection. Turnstile protection can work with only the Site Key and Secret Key, but Turnstile Analytics requires the additional Cloudflare API token.
If analytics data does not appear immediately, wait a short time and use the Check button again. Cloudflare analytics data may not always appear instantly after new Turnstile events.